This blog is a part of the series – Leverage SystemLink™ for Machine Learning.
Data visualization and annotation is a core component of any machine learning project. When applying machine learning to problems that are specific to your organization, the data has to come from your system. Naturally, these data may not be labeled, but supervised machine learning problems require lots of labeled data.
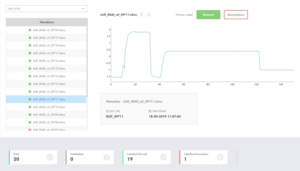
To perform labeling, one needs to visualize each of the data, annotate it and store the annotation. It is best accomplished when an intuitive app is developed. Here is an app developed for tagging and annotating waveform data.
NI SystemLink™ Server allows us to create custom web apps, which can be plugged in into the SystemLink™ Server. Such apps can make use of SystemLink™’s Web APIs to access the functions and data in SystemLink™ Server.
Note: Currently the SystemLink™ 18.5 can support only one custom plugin at a time
In this blog, we’ll walk you through the steps in building a custom WebApp.
Steps to build a custom web plugin for SystemLink™.
Step 1: Download and set up the Template
- Make sure SystemLink™ Server is installed.
- Download or clone the repository: https://github.com/ni/systemlink-web-interface-template
- Copy the
Web Server\htdocsandWeb Server\conffolders and files to your Skyline web server atC:\Program Files\National Instruments\Shared\Web Server - Modify
conf\htpriv.d\webvi_plugin.xmlto change the name of your application and permissions in the NI Web Server Configuration utility. - Modify
htdocs\plugins\webvi_plugin\resources\json\locales\en.jsonto change the display name of your web application as shown in the web interface. - Step 2: Create your SystemLink™ Web Plugin
Step 2: Create your SystemLink™ Web Plugin
- Replace
htdocs\plugins\webvi_plugin\index.htmlwith your application or modifyhtdocs\plugins\webvi_plugin\config.jsonif you need to launch a page other than index.html. - SystemLink™ use font awesome http://fontawesome.io/icons/ by default for SWIF icons and you can modify
htdocs\plugins\webvi_plugin\config.jsonto use a different icon. - From the Windows Start menu on your server, launch the NI Web Server Configuration utility. Click on the Control tab and then restart the Web Server.
- To define a custom icon
a) Add the icon image file to htdocs\plugins\webvi_plugin\resources\images.
b) Modify htdocs\plugins\webvi_plugin\resources\css\webvi_plugin.css to use the new icon.
c) Modify htdocs\plugins\webvi_plugin\config.json to use the new icon class.
Written by
Raghul Ravichandran
May 10, 2019